Steps and Their Uses:
This section will cover the different types of steps and how they are used so you can begin creating custom discounts right away!
There are 3 types of steps you can use to begin creating your discounts, Groups, Filters and Select.
The formatting for setting up these steps have been created in a logic-based format, with the use of logic like "And", "Or" and operators like "equals", "does not equal" and "less than or equal to" etc. and they will be explained further on in the document for you.
The reason for this setup is so that you can create any discount you can think of! You want it? You've got it!
Groups:
Groups are used when creating discounts for deals that require multiple items in a transaction before a discount is applied. This can be anything from meal deals, buy X get X free, or get X items for X price and more.
You will need to add items corresponding to the amount of items needed for the discount, so in the case of a buy 1 get 1 free, you will only need 2 items in the group.
First, add the group step by clicking the orange "ADD STEP" at the top right of the Steps section:
Then click "Add Group":
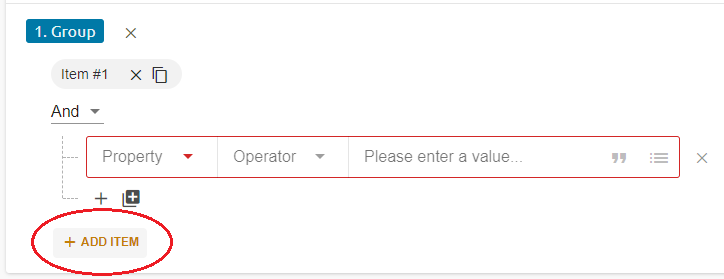
Next, you will see that a group step has been created, and an item has already been added to the group by default. To get another item, you can click the orange "ADD ITEM" beneath the group step:
Now you'll see two items in the group. Add as many items as you need for the deal. To see how to set up a whole buy X get X free deal, see the "Setting up Discounts: Advanced Discounts" document.
Filters:
This section covers the use of filters and how to create one.
Filters can narrow down the matching conditions for applying the deal so that only certain items have the discount applied to them. This is the main step used when creating simple discounts, and is also used often for many advanced discounts. In summary, this will most likely be your most used step in any discount.
To add a filter, start by doing the same step you did for groups by clicking "ADD STEP" and then click "Add Filter" which will put the step "Filter" into your steps list.
Select:
This step is simply to tell the discount how many items to take the discount off in the steps. This is usually placed after all groups and filters have done their calculations, so the programming of the discount is saying something along the lines of "all items matching N group and M filter are eligible for discount, but only discount X amount of items." Where N is the group, M is the filter ad X is the select.
This all might seem a little complicated at first, but once you get a grasp for it, you'll whizz through creating discounts.
First, add a step like we did groups and filters, by clicking the orange "ADD STEP" button and then "Add Select".
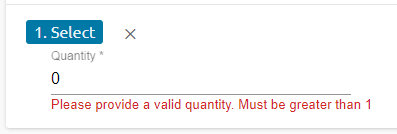
You'll see this box appear with the default value of 0. This default value actually gives an error underneath with the text "Please provide a valid quantity. Must be greater than 1". This error won't stop you from creating the discount, it just means that it won't be applying the discount to any items, thus meaning the select step might as well not be there. However, sometimes having it set to 0 is useful for placeholders, if you ever needed to change the discount in the future for any reason.
Property, Operator and Value:
Here the property, operator and value boxes that appear within groups and filters will be explained. These are called statements.
Property:
The property box is for choosing what you want the group item or filter to look for and compare for a match. This can be anything from item price, item name and item type to properties like the least expensive item in cart, the grand total of the cart, or even looking up specific customers. The last property I mentioned is good for setting up a staff discount for example when using the property "customer groups", assuming you have a customer group called "Staff".
Operator:
The operator is how you want to compare the property to the value you're looking for. For example, if you want to look up a specific item type, after setting the property to "item type", change the operator to "equals". Or, for the complete opposite, if you're looking for every other item type than "X", set the operator to "does not equal".
Value:
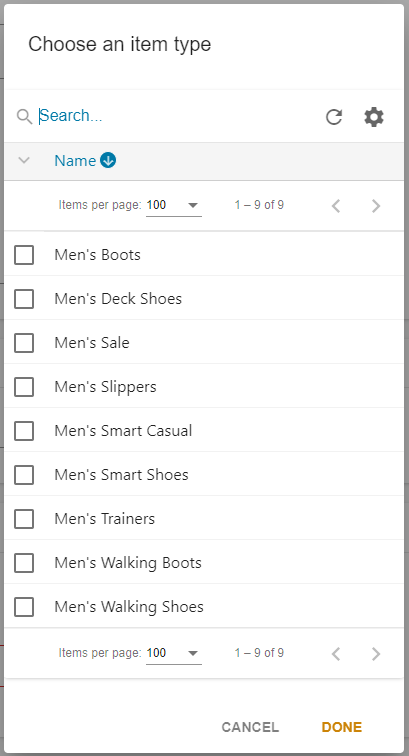
The value is simply the exact specifics of what you're looking for. Say you're a shoe company and you want to discount all men's trainers; set the property to "item type", the operator to "equals", and a drop down will appear that, when clicked, will show a list of all your item types:
Logic:
You might have noticed a small, separate drop down box above the block of drop downs with the logic "And" in. This can also be changed to "Or". These stand for the logic usually used in coding, this might make them sound complicated but really they're quite simple.
And:
The "And" logic compares if 2 different conditions are met. So, if you have a filter that is matching all items with the type "Men's Smart Shoes", but you only want to discount items above £70, then all you have to do is add another statement, not a new block, so that you now have 2 statements. Now set that statement's property to "item final price", the operator to "more than" and the text in the value box to "70".
And now the discount will only look for items that match both statements. You can add as many statements to this as you want, if the logic is set to "And" then the items will have to match every statement in that block.
Or:
The "Or" logic compares if only one of multiple conditions are met. As with the "And", add another statement to the block in the filter or group, and then change the logic from "And" to "Or". If we do this for the example we used in the "And" logic section, the discount would apply on any item over £70 and on any item in "Men's Smart Shoes".


